BBlogger Tutorials

How to get an Approved Google Adsense Account in 2 Hour?

Google Adsense is undoubtedly one of the best Ad network for bloggers and Web Masters but getting an approved adsense account was
never an easy procedure. However, those days are passed and now, You can get an Approved Adsense Account in 1 hour. Isn’t that
unbelievable? But it is true. In this post, I will show you "
How to get an Approved Adsense Account in 2 hours?"

  1. How to get an Approved Adsense Account in 2 hour ?
     You can get an Approved Adsense Account in 2 hours through the help of YouTube Monetization method. The whole
procedure is shown below:

        *  First of all, Create a New GMail Account. If you haven’t used your Old GMail account for Monetization then you
can also use your Old account as well. If your country is not supported by Adsense then choose a country like US and UK,
while creating New GMail Account.
        *  Login to your “YouTube” Account by visiting https://www.youtube.com
        *  Visit http://youtube.com/account_monetization
        *  Enable “Monetization” for your YouTube Account. The screenshot for doing the same is given below:

 
        *  After that, You will have to “Accept” all terms and condition. The screenshot of the same is given below:
   
        *  Finally, Click on “Monetize” Button. The screenshot of the same is given below:
                           
        * After doing that, You will receive an EMail in your Inbox.
        * Now, Upload a Unique video in your YouTube Account. While doing that, Don’t forget to add appropriate
description and Tags for videos. Wait for the upload to get completed. Once done, Publish it.
        * To associate an Adsense Account, Visit https://www.youtube.com/account_monetization and expand the topic
 “How Will I be Paid” and click on the link “Associate an Adsense Account“. The screenshot of the same is given below:                  

        * Now, You will be redirected to a screen, Where you will have to set up your Adsense Account. Click on “Continue
 button for filling your other details such as Address, Country, Payee Name etc

        * After clicking on “Continue” button, You will see the below given screen. Enter all details correctly.
        * After filling all details, Click on “Submit” button. Wait for 1-2 hours. You will get an EMail containing the
details of an Approved Adsense Account. Hurray….Hurray…enjoy.

  1. How to Use this Adsense Account for Displaying in your Blog and Website?
        * Login to your Adsense Account
        * Click on “Account Settings” or  “Paramètres du compte” option on Home Page. The screenshot of the same is given below:

        * Move to “Access and Authorization” section. You will find this section at the end of “Account Settings” Page.
        * Click on “Edit” link which appears next to “Only host sites are allowed to show ads for your account” option.

        * Remove the mark . The screenshot of the same is given below:
        * Finally, Create an Ad Unit and implement the code in your website.. Enjoy.

Damn-LOL Blogger Template

Damn LOL Blogger Template is perfect for pictorial related blogs and websites. It has a dark color scheme which looks dazzling with images. Damn LOL is one of the most prominent Troll Related website that shares Trolling pictures, Funny images and etc. This theme exactly looks a like Damn LOL. Furthermore, This Theme has all those features which are vital to run a picture based site. We are sure after applying it on your BlogSpot site you would never turn back to your old template.

Live Demo         Download 
Template Name: Damn LOL Blogger Template
Platform: Blogger / Blogspot
Release date : 25, December 2012
Author : www.templateism.com
License : Creative Commons Attribution 3.0

Features of Damn LoL Blogger Theme
  • Excellent Page Speed
  • Google Adsense (Advertisements) ready
  • Floating Older/Newer Post Buttons
  • SEO Friendly
  • Adapted From WordPress
More Features : Sidebar, Footer, Fixed Width, Dark Whitish background, Threaded commenting system.

Important Instructions:
Set One Post on Home Page: To Increase your page views rapidly, we would suggest everyone to display one post on the main page i.e. Homepage. Go To Blogger >> Settings >> Post and Comments >> and Select 1 Post to be displayed on Homepage. 
Have a Nice Day!

How Can You Know the Speed of Your Blog/Website?

the speed of blog is very important for any blogger, not only for visitors but in order to gain the trust of the search engines. Guest blog loved if they were light and fast loading, as well as search engine spiders like fast loading pages that do not consume precious time.You have to strike a balance between the content and speed of your blog to achieve a difficult equation.

First click on  Blog Speed Test Tool ,and do such as the below screen.
Note: After you click on check! wait some seconds to loading the page.
That is all. ;)

[Surprise] Get Google Adword Coupon €100 for FREE

Renewed Google's chance to take advantage of their offers beautiful, especially for owners of blogs and websites, where you can work free announcement in Google AdWord worth 20$ and up to the value to 135$, all you have to choose one links offers below, then you register by entering your namefull, Email through which will reach a free coupon.


 Here are the links, most of them are working:
https://services.google.com/fb/forms/couponsmenaen
https://services.google.com/fb/forms/rewolucjarequest
https://services.google.com/fb/forms/xsellcampaignnl
https://services.google.com/fb/forms/grcouponrequest
https://services.google.com/fb/forms/requestcoupon
https://services.google.com/fb/forms/couponsmenaar
https://services.google.com/fb/forms/jpawD6rhK8
https://services.google.com/fb/forms/royalmail09
https://services.google.com/fb/forms/agences100euro
https://services.google.com/fb/forms/awukemailRM
https://services.google.com/fb/forms/adwordscoupon
https://services.google.com/fb/forms/menacoupon
https://services.google.com/fb/forms/myawcoupon2
https://services.google.com/fb/forms/mainos
https://services.google.com/fb/forms/aquacoupon
https://services.google.com/fb/forms/stimulusin09
https://services.google.com/fb/forms/kelimeler
https://services.google.com/fb/forms/stimulusfr
https://services.google.com/fb/forms/twawcoupontest
https://services.google.com/fb/forms/updatenordicsda
https://services.google.com/fb/forms/cnawcoupon6
https://services.google.com/fb/forms/kbank
https://services.google.com/fb/forms/kupon
Enjoy!

How to Add a Shining CSS3 Horizontal Menu For Blogger

Horizontal menu best alternative option for labels or sections.
The importance of horizontal menu including: reducing the space occupied by the sections/labels and distort the appearance of blog, coordinate and beautify the style of blog.
This widget is designed by CSS3 technology, And you can add this gadget to your blog with very easy way:

Adding the widget to Blogger blog:
1. Go to Blogger Dashboard  → Layout → click on "Add a gadget".
2. Select "html/java script" and add the code given below:
<style type="text/css">.menu li{list-style:none;display:inline}.menu li a{-moz-transition:all 270ms ease-in-out 0s;-webkit-transition:all 310ms ease-in-out;-o-transition:all 270ms ease-in-out;background:url("https://blogger.googleusercontent.com/img/b/R29vZ2xl/AVvXsEgdKIO91f6Wdp2JnmkN94jqlQcFXtkvXy9g76LQmkMMZfepTifBVEdrngRaTTxWXxU0eOXsRNNJCwpS6JZyEcit6WDA-pxCDWARbOqymsLNUHPgbM-5Kl1UhkqjTDmJRYbhsu3IFQxC2-k/s1600/noop-menu-blogger.png") repeat scroll 0 0 transparent;border:1px solid #1357AF!important;border-radius:3px 3px 3px 3px;color:#FFFFFF!important;font:14px arial!important;padding:10px 38px!important;text-decoration:none;text-shadow:1px 1px 0 #000;margin-left:-5px}.menu li a:hover{background-position:right center!important}</style>
<a href="http://bbloggertutorials.blogspot.com" style="position: absolute;z-index:-11;"><img src="https://blogger.googleusercontent.com/img/b/R29vZ2xl/AVvXsEhIf_V-j9or8xXQ-cgZTVwBgv4qdh0_q5Bw3neb216VPvmrSuqet2dOzBsLyW2W-e3BlB5yF5yPMQ_NWg1JUZqDWq3L9LT4cxfB4ponxdfPrEOGlmTnKSv730s-3pYEyGKX2thhBIWgi2A/s1600/1x1juice.png" /></a>
<div class="wg-shining-menu">
    <ul class="menu">
        <li><a href="http://bbloggertutorials.blogspot.com/">Home</a></li>
        <li><a href="#">Features</a></li>
        <li><a href="http://bbloggertutorials.blogspot.com/p/blogger-tools.html">Products</a></li>
        <li><a href="http://bbloggertutorials.blogspot.com/p/contact-me.html">Contact</a></li>
        <li><a href="http://bbloggertutorials.blogspot.com/p/sitemap.html">Tips</a></li>
        <li><a href="http://bbloggertutorials.blogspot.com/p/terms-and-conditions.html">Tricks</a></li>
        <li><a href="#">About</a></li>
    </ul>

</div>
NOTE
3. - Replace the URL in blue with your own.
    - Replace the tab name in red with your own.
4. Finally click on save.
Now you can see the result  (o)

How to Add Metro Style Social Widget for Blogger

Today I will give you a very nice addition to your blog and frankly I liked this widget a lot. It is a social networking sites widget on the form of Metro as in windows 8.

Adding the widget in Layout
1. Go to Blogger Dashboard  → Layout → click on "Add a gadget".
2. Select "html/java script" and add the code given below.
<div class="metro-social">
<li><a class="fb" href="Your Facebook URL here"></a></li>
<li><a class="tw" href="Your Twitter URL here"></a></li>
<li><a class="gp" href="Your GooGle + URL here"></a></li>
<li><a class="fd" href="Your FeedBurner URL here"></a></li>
</div>
<style>
/*Metro UI Social Profile Widget v2.0 by Tech Prevue Labs
Web link to gadget code: 
Distributed under license CC BY-NC-ND 3.0 INT
Please keep license information intact while using this widget*/
.metro-social{width:285px}
.metro-social li{position:relative;cursor:pointer;padding:0;list-style:none}
.metro-social .fb,.tw,.gp,.fd{z-index:7;float:left;margin:1px;position:relative;display:block}
.metro-social .fb{background:url(//goo.gl/6xmUk) no-repeat center center #1f69b3;width:140px;height:141px}
.metro-social .tw{background:url(//goo.gl/oyiFK) no-repeat center center #43b3e5;width:140px;height:70px}
.metro-social .gp{background:url(//goo.gl/oT0kF) no-repeat center center #da4a38;width:140px;height:69px}
.metro-social .fd{background:url(//goo.gl/ncoLY) no-repeat center center #e9a01c;width:282px;height:69px}
.metro-social li:hover .fb{background:url(//goo.gl/MH8AP) no-repeat center center #1f69b3}
.metro-social li:hover .tw{background:url(//goo.gl/hHRHv) no-repeat center center #43b3e5}
.metro-social li:hover .gp{background:url(//goo.gl/wva4B) no-repeat center center #da4a38}
.metro-social li:hover .fd{background:url(//goo.gl/JFGqn) no-repeat center center #e9a01c}
</style>
<br />
3. Replace "Your ..... URL here" with Your URL.
4. Click on save.
I hope you enjoy & happy blogging! :)

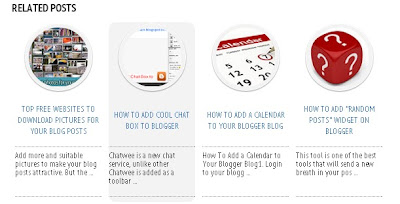
How To Add Related Posts Widget To Blogger With Summary

I wrote a previous blog post about How To Add Related Posts Widget To Blogger With Thumbnails.We already know the importance of the widget, but in this tutorial I'll show you the best related posts widget to your blog , If you want to add this widget to your blog please follow me:

1. Go to Blogger Dashboard  --> Template
2. Please! download  a copy of your template
3. Now click on Edit HTML
4. Use Ctrl+F to find </head>
5. Then copy and paste the below code just above/before it ( </head> ):
<script type='text/javascript'>
//<![CDATA[
var relatedTitles = new Array();
var relatedUrls = new Array();
var relatedpSummary = new Array();
var relatedThumb = new Array();
var relatedTitlesNum = 0;

var relatedPostsNum = 4; // number of entries to be shown
var relatedmaxnum = 75; // the number of characters of summary
var relatednoimage = "https://blogger.googleusercontent.com/img/b/R29vZ2xl/AVvXsEgHzzs0ZW_PjZye3fdfCtUZecfnD52RlVW2ZuGrSAPIVwmpdaMlnPyG7sY6CEPrhBCx10_-Zk71hIDLAVG25QmzwG5Cim8jGvnwa9CCFwtbMl7HgubVryWCORyNmV8gz-WlMgg3tUdI1sWQ/s1600/no_image.jpg"; // default picture for entries with no image

function readpostlabels(json) {
  var entry, postimg, postcontent, cat;
  for (var i = 0; i < json.feed.entry.length; i++) {
    entry = json.feed.entry[i];
    if (i==json.feed.entry.length) { break; }
    relatedTitles[relatedTitlesNum] = entry.title.$t;
    postcontent = "";
    if ("content" in entry) {
      postcontent = entry.content.$t;
    } else if ("summary" in entry) {
      postcontent = entry.summary.$t;
    }
    relatedpSummary[relatedTitlesNum] = removetags(postcontent,relatedmaxnum);
    if ("media$thumbnail" in entry) {
      postimg = entry.media$thumbnail.url;
    } else {
      postimg = relatednoimage;
    }
    relatedThumb[relatedTitlesNum] = postimg;
    for (var k = 0; k < entry.link.length; k++) {
      if (entry.link[k].rel == 'alternate') {
        relatedUrls[relatedTitlesNum] = entry.link[k].href;
        break;
      }
    }
    relatedTitlesNum++;
  }
}
function showrelated() {
  var tmp = new Array(0);
  var tmp2 = new Array(0);
  var tmp3 = new Array(0);
  var tmp4 = new Array(0);
  for(var i = 0; i < relatedUrls.length; i++) {
    if(!contains(tmp, relatedUrls[i])) {
      tmp.length += 1; tmp[tmp.length - 1] = relatedUrls[i];
      tmp2.length += 1; tmp2[tmp2.length - 1] = relatedTitles[i];
      tmp3.length += 1; tmp3[tmp3.length - 1] = relatedpSummary[i];
      tmp4.length += 1; tmp4[tmp4.length - 1] = relatedThumb[i];
    }
  }
  relatedTitles = tmp2; relatedUrls = tmp; relatedpSummary = tmp3; relatedThumb = tmp4;
  for(var i = 0; i < relatedTitles.length; i++){
    var index = Math.floor((relatedTitles.length - 1) * Math.random());
    var tempTitle = relatedTitles[i]; var tempUrls = relatedUrls[i];
    var tempResum = relatedpSummary[i]; var tempImage = relatedThumb[i];
    relatedTitles[i] = relatedTitles[index]; relatedUrls[i] = relatedUrls[index];
    relatedpSummary[i] = relatedpSummary[index]; relatedThumb[i] = relatedThumb[index];
    relatedTitles[index] = tempTitle; relatedUrls[index] = tempUrls;
    relatedpSummary[index] = tempResum; relatedThumb[index] = tempImage;
  }
  var somePosts = 0;
  var r = Math.floor((relatedTitles.length - 1) * Math.random());
  var relsump = r; 
  var output;
  var dirURL = document.URL;

  while (somePosts < relatedPostsNum) {
    if (relatedUrls[r] != dirURL) {

      output = "<div class='relatedsumposts'>";
      output += "<a href='" + relatedUrls[r] + "' rel='nofollow'  target='_self' title='" + relatedTitles[r] + "'><img src='" + relatedThumb[r] + "' /></a>";
      output += "<h6><a href='" + relatedUrls[r] + "' target='_self'>" + relatedTitles[r] + "</a></h6>";
      output += "<p>" + relatedpSummary[r] + " ... </p>";
      output += "</div>";
      document.write(output);
      
      somePosts++;
      if (somePosts == relatedPostsNum) { break; }
    }
    if (r < relatedTitles.length - 1) {

      r++;
    } else {
      
      r = 0;
    }

    if(r==relsump) { break; }
  }
}
function removetags(text,length){
  var pSummary = text.split("<");
  for(var i=0;i<pSummary.length;i++){
    if(pSummary[i].indexOf(">")!=-1){
      pSummary[i] = pSummary[i].substring(pSummary[i].indexOf(">")+1,pSummary[i].length);
    }
  }
  pSummary = pSummary.join("");
  pSummary = pSummary.substring(0,length-1);
  return pSummary;
function contains(a, e) {
  for(var j = 0; j < a.length; j++) if (a[j]==e) return true;
  return false;
}
//]]>
</script>

Note:
- To change the default picture, replace the URL in pink with your own
- For displaying more than 4 posts or less, replace modify the value in red (4)
To change the number of characters to be shown in posts summary, modify the value in blue (75)
5. Now Search the following code:
<a expr:href='data:label.url' rel='tag'><data:label.name/></a><b:if cond='data:label.isLast != &quot;true&quot;'>,</b:if>
6. Just after it, copy and paste the below code:
<b:if cond='data:blog.pageType == &quot;item&quot;'>
    <script expr:src='&quot;/feeds/posts/default/-/&quot; + data:label.name + &quot;?alt=json-in-script&amp;callback=readpostlabels&amp;max-results=50&quot;' type='text/javascript'/>
  </b:if>
7. Now find the following code:
</b:includable>          
                <b:includable id='postQuickEdit' var='post'>
8. Then copy and paste the below code just above/before it
<b:if cond='data:blog.pageType == &quot;item&quot;'>
  <div class='post-footer-line post-footer-line-4'>
    <div id='relatedpostssum'><div style='text-align: left; font-size: 15px; margin-bottom: 10px; font-weight: bold;'>RELATED POSTS</div>
      <script type='text/javascript'>showrelated();</script>
    </div>
    <div style='clear:both;'/>
  </div>
</b:if>
9.  Finally search for this tag:  ]]></b:skin>
10. Add below CSS code just above it,
<relatedsumposts {
  float: left;
  margin: 0px 5px;
  overflow: hidden;
  text-align: center;
  /* width and height of the related posts area */
  width: 120px;
  height: 210px;
}

.relatedsumposts:hover { 
background-color: #F3F3F3; -webkit-border-radius: 10px;
-moz-border-radius: 10px;
border-radius: 10px;
}

.relatedsumposts img:hover {
-khtml-opacity:0.4;
-moz-opacity:0.4;
opacity:0.4;
}

.relatedsumposts a {
  /* link properties */
color: #linkcolor;
  display: inline;
  font-size: 10px;
  line-height: 1;
}
.relatedsumposts img {
  /* thumbnail properties */
margin-top: 2px;
  height: 82px;
  padding: 5px;
  width: 82px;
border: 1px solid #fff;
-webkit-border-radius: 100px;
-moz-border-radius: 100px;
border-radius: 100px;
-webkit-box-shadow: 0 1px 2px rgba(0, 0, 0, .4);
-moz-box-shadow: 0 1px 2px rgba(0, 0, 0, .4);
box-shadow: 0 1px 2px rgba(0, 0, 0, .4);
}
.relatedsumposts h6 {
  /* title properties */
  display: table-cell;
  height: 5em;
  margin: 5px 0 0;
  overflow: hidden;
  padding-bottom: 2px;
  vertical-align: middle;
  width: 130px;
}

.relatedsumposts p {
  /* summary properties */
border-top: 1px dotted #777777;
border-bottom: 1px dotted #777777;
color: #summarycolor;
  font-size: 10px;
  height: 4em;
  line-height: 1;
  margin: 5px 0 0;
  overflow: hidden;
  padding: 5px 0 15px 0;
  text-align: left;
}
Note:
-Modify the values in red to adjust the width (120) and height (210) of the widget area
-Replace #linkcolor with the hex value of your color to change the color of post titles
-To change the size of thumbnails, modify the values marked in pink (82)
-To determine the border roundness, modify the values in green (100)
-To change the color of the post snippet, change #summarycolor with color hex value
11. Now take a preview and save your template.