Showing posts with label jquery. Show all posts

How to Add Smileys/Emoticons in Blogger Comments

The Smileys/Emoticons way to give the visitors a lot of fun and confidence to your blog,It is known that these smileys used in social websites as Facebook.
To do this just follow the steps:

1.  Go to Blogger Dashboard  --> Template
2.  Please! download  a copy of your template
3.  Now click on Edit HTML
4.  Use Ctrl+F to find </body>
5.  Then copy and paste just  above/before it, this code:
<b:if cond='data:blog.pageType == "item"'>
<script type='text/javascript'>
//<![CDATA[
jQuery(document).ready(function () {emoticonx({
emoRange:"#comments p, div.emoWrap",
putEmoAbove:"iframe#comment-editor",
topText:"Click to see the code!",
emoMessage:"To insert emoticon you must added at least one space before the code."
})
});
//]]>
</script>
<script src='https://boyz.googlecode.com/svn/JS/emoticonnya.js' type='text/javascript'/>
</b:if>

Note: You can change blue with your own words.
6. Now the next step to find the code ]]></b:skin>
7. Then copy and paste just  above/before it, this code:
.emoWrap {
  position:relative;
  padding:10px;
  margin-bottom:7px;
  background:#fff;
/* IE10 Consumer Preview */
background-image: -ms-linear-gradient(right, #FFFFFF 0%, #FFF9F2 100%);
/* Mozilla Firefox */
background-image: -moz-linear-gradient(right, #FFFFFF 0%, #FFF9F2 100%);
/* Opera */
background-image: -o-linear-gradient(right, #FFFFFF 0%, #FFF9F2 100%);
/* Webkit (Safari/Chrome 10) */
background-image: -webkit-gradient(linear, right top, left top, color-stop(0, #FFFFFF), color-stop(1, #FFF9F2));
/* Webkit (Chrome 11+) */
background-image: -webkit-linear-gradient(right, #FFFFFF 0%, #FFF9F2 100%);
/* W3C Markup, IE10 Release Preview */
background-image: linear-gradient(to left, #FFFFFF 0%, #FFF9F2 100%);
  border:3px solid #860000;
  -moz-border-radius:5px;
  -webkit-border-radius:5px;
  border-radius:5px;
  box-shadow:0 4px 6px rgba(0,0,0,0.1),0 1px 1px rgba(0,0,0,0.3);
  -moz-box-shadow:0 4px 6px rgba(0,0,0,0.1),0 1px 1px rgba(0,0,0,0.3);
  -webkit-box-shadow:0 4px 6px rgba(0,0,0,0.1),0 1px 1px rgba(0,0,0,0.3);
  box-shadow:0 2px 6px rgba(0,0,0,0.1),0 1px 1px rgba(0,0,0,0.3);
  font-weight:normal;
  color:#333;
}
.emoWrap:after {
  content:"";
  position:absolute;
  bottom:-10px;
  left:10px;
  border-top:10px solid #860000;
  border-right:20px solid transparent;
  width:0;
  height:0;
  line-height:0;
}
8. Add the below code above/before </head>
<script src='https://ajax.googleapis.com/ajax/libs/jquery/1.8.3/jquery.min.js' type='text/javascript'/
9. Finally click save template.
Now you can see the result and be happy. :-d

How to Add Cool Chat Box to Blogger

Chatwee is a new chat service, unlike other Chatwee is added as a toolbar and chat deployed on the right side (you can switch to the left), showing the flag next to the user depending on the country where connect. Its design is attractive, however the functions are very limited because you can not choose a nickname unless you register, and so far I still do not know how to change the avatar once you're registered. But yes, it has the advantage of allowing users to share files such as PDF, music and photos.
Once you register you'll have the code you can use on your blog, you can also customize the colors of it.

It is recommended to have a script that prevents the redirection of countries, since the chat is only displayed in the URL you have registered, so if someone from another country comes in and adds another extension is not shown.

How to Add Cool Chat Box to Blogger?


Step 1

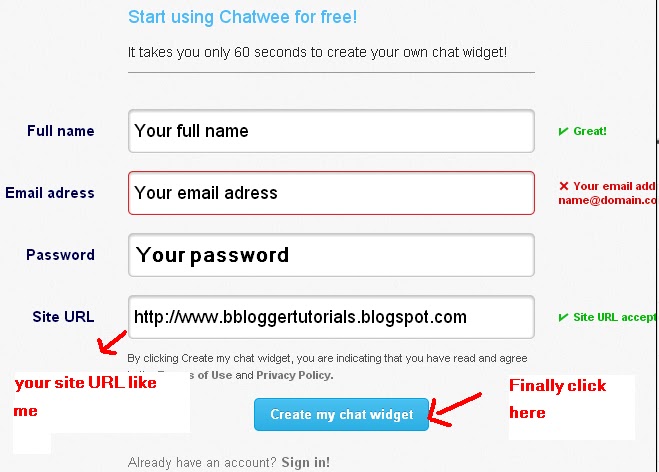
1- Go to the following link: chatwee
2- And do like the image


3- After creating your chatwee account, login to your account with your username and password, then you will see a code, just click on “Copy script to clipboard”.

Step 2
1- Login to your blogger dashboard --> Layout --> 'Add A Gadget' --> Html/Javascript
2- then paste the code into the box and then Save Arrangement
3- Now go to your blog to see your chat box.

How To Add Zoom Effect in Blogger Images

How to add zoom effect in your blog?

1. go to Blogger Dashboard > Template
2. Download a copy of your template
3. Now click on Edit HTML
4. Hit Proceed button
5. Check Expand Widget Templates checkbox
6. Use ctrl F to find ]]></b:skin> and paste the following code above/before it.
.zoomeffect img{
-webkit-transform:scale(0.8);
-moz-transform:scale(0.8);
-o-transform:scale(0.8);
-webkit-transition-duration: 0.5s;
-moz-transition-duration: 0.5s;
-o-transition-duration: 0.5s;
opacity: 0.7;
margin: 0 10px 5px 0;
}

.zoomeffect img:hover{
-webkit-transform:scale(1.1);
-moz-transform:scale(1.1);
-o-transform:scale(1.1);
opacity: 1;
}

 7. Click on Save the template


How to activate it on images?

Whenever you have uploaded any image in your post editor, simply switch to HTML mode and change the class from what ever it is, to zoomeffect.

Example: Your image class in post editor will be <div class="seperator", now change it to <div class="zoomeffect"

If you are adding it to any other part on your blog, you can use the following code.
 <a class="zoomeffect" href="YOUR-IMAGE-URL/" target="_blank">
<img src="http://YOUR-IMAGE-URL" /></a>

Replace YOUR-IMAGE-URL with the link of the image you want to apply the effect to.
That's all!

Smooth Jquery Featured Post Slideshow For Blogger


This tutorial will shows you how to add featured content slideshow to show your featured post to your readers.This slideshow is very easy to setup and can easily manage width and height to match your template.Not only that you can change the speed of this slideshow easily.Default width is 550px and Default height is 200px. I think you will love this slideshow.You can see the DEMO of this widget from here.

1. Login to your blogger dashboard--> Template- -> Edit HTML
2. Scroll down to where you see </head> tag .
3. Copy below code and paste it just before the </head> tag .


<script src='http://ajax.googleapis.com/ajax/libs/jquery/1.9.0/jquery.min.js' type='text/javascript'></script>
<script type='text/javascript'>
//<![CDATA[

/* ------------------------------------------------------------------------
s3Slider

Developped By: Boban Karišik -> http://www.serie3.info/
 CSS Help: Mészáros Róbert -> http://www.perspectived.com/
Version: 1.0

Copyright: Feel free to redistribute the script/modify it, as
  long as you leave my infos at the top.
-------------------------------------------------------------------------- */

(function($){

$.fn.s3Slider = function(vars) {

 var element     = this;
 var timeOut     = (vars.timeOut != undefined) ? vars.timeOut : 4000;
 var current     = null;
 var timeOutFn   = null;
 var faderStat   = true;
 var mOver       = false;
 var items       = $("#" + element[0].id + "Content ." + element[0].id + "Image");
 var itemsSpan   = $("#" + element[0].id + "Content ." + element[0].id + "Image span");

 items.each(function(i) {

     $(items[i]).mouseover(function() {
        mOver = true;
     });

     $(items[i]).mouseout(function() {
         mOver   = false;
         fadeElement(true);
     });

 });

 var fadeElement = function(isMouseOut) {
     var thisTimeOut = (isMouseOut) ? (timeOut/2) : timeOut;
     thisTimeOut = (faderStat) ? 10 : thisTimeOut;
     if(items.length > 0) {
         timeOutFn = setTimeout(makeSlider, thisTimeOut);
     } else {
         console.log("Poof..");
     }
 }

 var makeSlider = function() {
     current = (current != null) ? current : items[(items.length-1)];
     var currNo      = jQuery.inArray(current, items) + 1
     currNo = (currNo == items.length) ? 0 : (currNo - 1);
     var newMargin   = $(element).width() * currNo;
     if(faderStat == true) {
         if(!mOver) {
             $(items[currNo]).fadeIn((timeOut/6), function() {
                 if($(itemsSpan[currNo]).css('bottom') == 0) {
                     $(itemsSpan[currNo]).slideUp((timeOut/6), function() {
                         faderStat = false;
                         current = items[currNo];
                         if(!mOver) {
                             fadeElement(false);
                         }
                     });
                 } else {
                     $(itemsSpan[currNo]).slideDown((timeOut/6), function() {
                         faderStat = false;
                         current = items[currNo];
                         if(!mOver) {
                             fadeElement(false);
                         }
                     });
                 }
             });
         }
     } else {
         if(!mOver) {
             if($(itemsSpan[currNo]).css('bottom') == 0) {
                 $(itemsSpan[currNo]).slideDown((timeOut/6), function() {
                     $(items[currNo]).fadeOut((timeOut/6), function() {
                         faderStat = true;
                         current = items[(currNo+1)];
                         if(!mOver) {
                             fadeElement(false);
                         }
                     });
                 });
             } else {
                 $(itemsSpan[currNo]).slideUp((timeOut/6), function() {
                 $(items[currNo]).fadeOut((timeOut/6), function() {
                         faderStat = true;
                         current = items[(currNo+1)];
                         if(!mOver) {
                             fadeElement(false);
                         }
                     });
                 });
             }
         }
     }
 }

 makeSlider();

};

})(jQuery);

//]]>
</script>
<script type='text/javascript'>
$(document).ready(function() {
$('#s3slider').s3Slider({
timeOut: 4000
});
});
</script>
<style type='text/css'>
#s3slider {
background:#000000;
border:1px solid #818e8f;
width: 550px;
height: 200px;
position: relative;
overflow: hidden;
}
#s3sliderContent {
width: 550px;
position: absolute;
top:0px;
padding: 0px;
margin: 0px;
}
.s3sliderImage {
float: left;
position: relative;
display: none;
}
.s3sliderImage span {
position: absolute;
left: 0;
font: 20px Trebuchet MS, sans-serif;
padding: 10px 0px;
width: 550px;
background-color: #000;
filter: alpha(opacity=80);
-moz-opacity: 0.8;
-khtml-opacity: 0.8;
opacity: 0.8;
color: #fff;
display: none;
bottom: 0;
text-align:center;
}
.clear {
clear: both;
}
</style>

NOTE : To change the speed of slideshow, change the value 4000.

4. Save your template.
5. Now go to Layout--> click on "Add a gadget".
6. Select "html/java script" and add the code given below and click save.


<div id="s3slider">
<ul id="s3sliderContent">

<li class="s3sliderImage"><a href="YOUR-LINK-HERE"><img style="width:650px;height:300px;" src="https://blogger.googleusercontent.com/img/b/R29vZ2xl/AVvXsEiyrh5Qus9kxfOvzBXEpWsZwwoSbsnGTdv_U0WVGNbGT-IAtjyw0UbOyFfA1m4HnTPhTUBiocSHkyYXAPLAwzNIvyFTnTkdcvqcjfT9vo5JlQ0-1XUPFCqf8Fxt8mPFfUnzKhuxylc5y-jP/s1600/screen1.jpg" /><span>Fish Dom 2</span></a></li>

<li class="s3sliderImage"><a href="YOUR-LINK-HERE"><img style="width:650px;height:300px;" src="https://blogger.googleusercontent.com/img/b/R29vZ2xl/AVvXsEjmDagVVwPFvLKj9Szx8TbYtGSGFTO4vtDfBKrFSH3gghuzFelp5mIgnpi_qhCX0v0u87SG-5Ebn_HSytjCU-bOjmrCrtBXj1ujN0nndjeXJe2wMHo4d6EoqtZ_S1VB_PlD7Wi5sDCkToLa/s1600/Mini+Racing+3D.jpg" /><span>Mini Racing 3D</span></a></li>

<li class="s3sliderImage"><a href="YOUR-LINK-HERE"><img style="width:650px;height:300px;" src="https://blogger.googleusercontent.com/img/b/R29vZ2xl/AVvXsEilviU7QTrZYxvdRVi-imhr6xMXvPnCYwoVZQfsqsmYoNRpgL2n1o6NpQxg9qk52H45cKYo1BFtrkYp-2tLIsP1qjAxAJmrs6LiSZOHvntHYoK72PfneiOtn0uh4dFM4FXSv1GEc_tl6cyV/s1600/galaxy-life.jpg" /><span>Galaxy Life</span></a></li>

<li class="s3sliderImage"><a href="YOUR-LINK-HERE"><img style="width:650px;height:300px;" src="https://blogger.googleusercontent.com/img/b/R29vZ2xl/AVvXsEiyrh5Qus9kxfOvzBXEpWsZwwoSbsnGTdv_U0WVGNbGT-IAtjyw0UbOyFfA1m4HnTPhTUBiocSHkyYXAPLAwzNIvyFTnTkdcvqcjfT9vo5JlQ0-1XUPFCqf8Fxt8mPFfUnzKhuxylc5y-jP/s1600/screen1.jpg" /><span>Fish Dom 2</span></a></li>

<li class="s3sliderImage"></li>
</ul>
</div>

<div class='clear'></div>


NOTE : Replace YOUR-LINK-HERE and images with your content.

Now you have successfully installed this slide show to your site.