Showing posts with label HTML. Show all posts

How to Add a Logo to Your Blog on Blogger

There are many simple tools that give excellence for blogs, including the design of  template and colors ... etc., today we will learn how to add a logo to your blogger blog , which is an image or text excellence your blog from the rest of other blogs, and the benefits of logo is keeping visitors to your blog and also give her aesthetic.

1. Go to "Blogger Dashboard" > "Layout" "Edit" like the following screen

2. After click on "Editwill appears for you this pop up.
3. Click on ''Choose File'' and upload your logo image from you computer or paste your image url in "From the web. Paste an image URL below" box.
4. Select ''Instead of this description" like the above screen.
5. Finally click on save button.

Free Flash Games For Your Website or Blog

HTML code contains more than 400 games, which is free to your website/blog, These games provided by www.freegaming.de .


To do this just follow me:
- Simply copy the following code (Html) to your Homepage,Blog,EMail or Website.
<iframe src="http://www.freeonlinegamesplay247.com/webmastercontent/fungames.php" style="border:0px #FFFFFF none;" border="0" name="FunGames Collection" scrolling="auto" frameborder="0" marginheight="0px" marginwidth="0px" height="700" width="600"></iframe>

Note: Edit the "height="700" and the "width="600" parameter to fit your personal needs.

How to Add Smileys/Emoticons in Blogger Comments

The Smileys/Emoticons way to give the visitors a lot of fun and confidence to your blog,It is known that these smileys used in social websites as Facebook.
To do this just follow the steps:

1.  Go to Blogger Dashboard  --> Template
2.  Please! download  a copy of your template
3.  Now click on Edit HTML
4.  Use Ctrl+F to find </body>
5.  Then copy and paste just  above/before it, this code:
<b:if cond='data:blog.pageType == "item"'>
<script type='text/javascript'>
//<![CDATA[
jQuery(document).ready(function () {emoticonx({
emoRange:"#comments p, div.emoWrap",
putEmoAbove:"iframe#comment-editor",
topText:"Click to see the code!",
emoMessage:"To insert emoticon you must added at least one space before the code."
})
});
//]]>
</script>
<script src='https://boyz.googlecode.com/svn/JS/emoticonnya.js' type='text/javascript'/>
</b:if>

Note: You can change blue with your own words.
6. Now the next step to find the code ]]></b:skin>
7. Then copy and paste just  above/before it, this code:
.emoWrap {
  position:relative;
  padding:10px;
  margin-bottom:7px;
  background:#fff;
/* IE10 Consumer Preview */
background-image: -ms-linear-gradient(right, #FFFFFF 0%, #FFF9F2 100%);
/* Mozilla Firefox */
background-image: -moz-linear-gradient(right, #FFFFFF 0%, #FFF9F2 100%);
/* Opera */
background-image: -o-linear-gradient(right, #FFFFFF 0%, #FFF9F2 100%);
/* Webkit (Safari/Chrome 10) */
background-image: -webkit-gradient(linear, right top, left top, color-stop(0, #FFFFFF), color-stop(1, #FFF9F2));
/* Webkit (Chrome 11+) */
background-image: -webkit-linear-gradient(right, #FFFFFF 0%, #FFF9F2 100%);
/* W3C Markup, IE10 Release Preview */
background-image: linear-gradient(to left, #FFFFFF 0%, #FFF9F2 100%);
  border:3px solid #860000;
  -moz-border-radius:5px;
  -webkit-border-radius:5px;
  border-radius:5px;
  box-shadow:0 4px 6px rgba(0,0,0,0.1),0 1px 1px rgba(0,0,0,0.3);
  -moz-box-shadow:0 4px 6px rgba(0,0,0,0.1),0 1px 1px rgba(0,0,0,0.3);
  -webkit-box-shadow:0 4px 6px rgba(0,0,0,0.1),0 1px 1px rgba(0,0,0,0.3);
  box-shadow:0 2px 6px rgba(0,0,0,0.1),0 1px 1px rgba(0,0,0,0.3);
  font-weight:normal;
  color:#333;
}
.emoWrap:after {
  content:"";
  position:absolute;
  bottom:-10px;
  left:10px;
  border-top:10px solid #860000;
  border-right:20px solid transparent;
  width:0;
  height:0;
  line-height:0;
}
8. Add the below code above/before </head>
<script src='https://ajax.googleapis.com/ajax/libs/jquery/1.8.3/jquery.min.js' type='text/javascript'/
9. Finally click save template.
Now you can see the result and be happy. :-d

How to Show Post Title Only on Home Page in Blogger

I will explain to you in this tutorial how to show post title only in the Home page in your blogger blog. this a simple code works on show titles only and is not a title and post together, where the title appears on the home page of the blog just by clicking on it redirects to the main post, and to be able to install this code in your blog, follow these simple steps:


1. Login to your Blogger Dashboard > Template
2. Download a copy of your template
3. Now click on Edit HTML
4. Use Ctrl + F to find </head> and paste the following code above/before it.
<style type='text/css'>

<b:if cond='data:blog.url == data:blog.homepageUrl'>

.post {
margin:.5em 0 1.5em;
border-bottom:0px dotted $bordercolor;
padding-bottom:1.0em;
height:50px;
}
.post h3 {
margin:.25em 0 0;
padding:0 0 4px;
font-size:20px;
font-family:Tahoma,Georgia,Century gothic,Arial,sans-serif;
font-weight:normal;
line-height:1.4em;
color:#cc6600;
}

.post h3 a, .post h3 a:visited, .post h3 strong {
display:block;
text-decoration:none;
color:#cc6600;
font-weight:normal;
}

.post h3 strong, .post h3 a:hover {color:#333333;}

.post-body {display:none;}
.post-footer {display:none;}
.comment-link {display:none;}
.post img {display:none;}
.post blockquote {display:none;}
.post blockquote p {display:none;}
h2.date-header {display:none;}
.post-labels {display:none;}
.post-rating {display:none;}

</b:if>

</style>
5. Finally, click on Save the template.
Enjoy and happy blogging! ;)

How to Add "Change Text Size And Font Face Gadget" For Blogger

How to Add Text And Font Gadget To Your Blog

1. Login to your blogger dashboard--> Layout-->'Add A Gadget'--> Choose HTML/JavaScript
2. Copy and paste the code below into the HTML/JavaScript gadget :
<script>
function go1(){
if (document.selecter2.select2.options
[document.selecter2.select2.selectedIndex].value != "none") {
document.getElementById('main').style.fontSize
=document.selecter2.select2.options
[document.selecter2.select2.selectedIndex].value
}
}

function go2(){
if (document.selecter2.select3.options
[document.selecter2.select3.selectedIndex].value != "none") {
document.getElementById('main').style.fontFamily
=document.selecter2.select3.options
[document.selecter2.select3.selectedIndex].value
}
}
</script>
<form id="forma" name="selecter2" method="POST">

<select onchange="go2()" style="font-family:verdana;font-size:8pt" name="select3" size="1">
<option value="Times New Roman"/>Times New Roman
<option value="Arial"/>Arial
<option selected value="Book Antiqua"/>Book Antiqua
<option value="Bookman Old Style"/>Bookman Old Style
<option value="Century Gothic"/>Century Gothic
<option value="Comic Sans Ms"/>Comic Sans Ms
<option value="Tahoma"/>Tahoma
<option selected value="Trebuchet Ms"//>Trebuchet Ms
<option value="Verdana"/>Verdana
</select>
<select onchange="go1()" style="font-family:verdana;font-size:8pt" name="select2" size="1">
<option value="8px"/>8
<option value="9px"/>9
<option value="10px"/>10
<option value="11px"/>11
<option selected value="12px"/>12
<option value="14px"/>14
<option value="16px"/>16
<option value="18px"/>18
</select></form>
3. Save HTML/JavaScript you are done.

How to Add Cool Chat Box to Blogger

Chatwee is a new chat service, unlike other Chatwee is added as a toolbar and chat deployed on the right side (you can switch to the left), showing the flag next to the user depending on the country where connect. Its design is attractive, however the functions are very limited because you can not choose a nickname unless you register, and so far I still do not know how to change the avatar once you're registered. But yes, it has the advantage of allowing users to share files such as PDF, music and photos.
Once you register you'll have the code you can use on your blog, you can also customize the colors of it.

It is recommended to have a script that prevents the redirection of countries, since the chat is only displayed in the URL you have registered, so if someone from another country comes in and adds another extension is not shown.

How to Add Cool Chat Box to Blogger?


Step 1

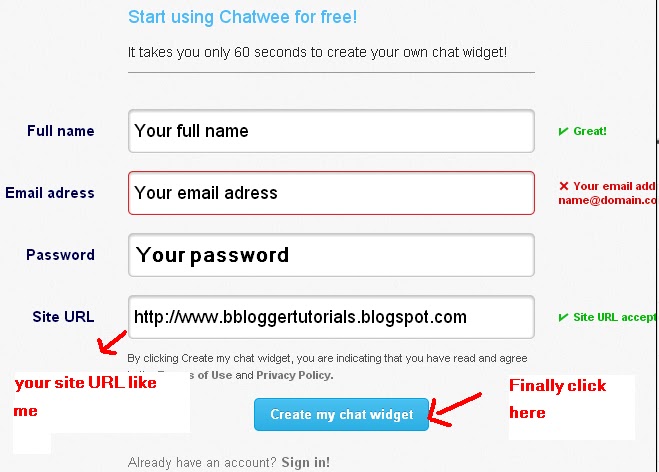
1- Go to the following link: chatwee
2- And do like the image


3- After creating your chatwee account, login to your account with your username and password, then you will see a code, just click on “Copy script to clipboard”.

Step 2
1- Login to your blogger dashboard --> Layout --> 'Add A Gadget' --> Html/Javascript
2- then paste the code into the box and then Save Arrangement
3- Now go to your blog to see your chat box.

How To Add a Clock To Your Blogger Blog


How To Add a Clock To Your Blogger Blog


1. Login to your blogger dashboard--> Layout-->'Add A Gadget'
2. Choose Html/Javascript Gadget and add the one of code given below : 


<object><param name="movie" value="http://flash-clocks.com/free-flash-clocks-for-websites/free-flash-clock-23.swf">
<embed src="http://flash-clocks.com/free-flash-clocks-for-websites/free-flash-clock-23.swf" width="150" height="150" 
wmode="transparent"> </embed></object>


<object><param name="movie" value="http://flash-clocks.com/free-flash-clocks-for-websites/free-flash-clock-33.swf">
<embed src="http://flash-clocks.com/free-flash-clocks-for-websites/free-flash-clock-33.swf" width="150" height="150" 
wmode="transparent"> </embed></object>


<object><param name="movie" value="http://flash-clocks.com/free-flash-clocks-for-websites/free-flash-clock-58.swf">
<embed src="http://flash-clocks.com/free-flash-clocks-for-websites/free-flash-clock-58.swf" width="150" height="150" wmode="transparent"></embed></object>


<embed height="200" src="http://flash-clocks.com/free-flash-clocks-blog-topics/free-flash-clock-190.swf" type="application/x-shockwave-flash" width="200" wmode="transparent"></embed>


<embed height="200" src="http://flash-clocks.com/free-flash-clocks-blog-topics/free-flash-clock-183.swf" type="application/x-shockwave-flash" width="200" wmode="transparent"></embed>


<object><param name="movie" value="http://flash-clocks.com/free-flash-clocks-for-websites/free-flash-clock-63.swf">
<embed src="http://flash-clocks.com/free-flash-clocks-for-websites/free-flash-clock-63.swf" width="150" height="150" wmode="transparent"> </embed></object>


<object><param name="movie" value="http://flash-clocks.com/free-flash-clocks-for-websites/free-flash-clock-15.swf">
<embed src="http://flash-clocks.com/free-flash-clocks-for-websites/free-flash-clock-15.swf" width="150" height="150" wmode="transparent"> </embed></object>


<object><param name="movie" value="http://flash-clocks.com/free-flash-clocks-for-websites/free-flash-clock-8.swf">
<embed src="http://flash-clocks.com/free-flash-clocks-for-websites/free-flash-clock-8.swf" width="150" height="150" wmode="transparent"> </embed></object>


<embed src=http://safir85.ucoz.com/bdlab-blogspot/24work/WorldCupClock.swf width=200 height=200 wmode=transparent type=application/x-shockwave-flash></embed>


3. Save HTML/Javascript you are done.
For more visit:      freeflashclocks.com 

How To Add Zoom Effect in Blogger Images

How to add zoom effect in your blog?

1. go to Blogger Dashboard > Template
2. Download a copy of your template
3. Now click on Edit HTML
4. Hit Proceed button
5. Check Expand Widget Templates checkbox
6. Use ctrl F to find ]]></b:skin> and paste the following code above/before it.
.zoomeffect img{
-webkit-transform:scale(0.8);
-moz-transform:scale(0.8);
-o-transform:scale(0.8);
-webkit-transition-duration: 0.5s;
-moz-transition-duration: 0.5s;
-o-transition-duration: 0.5s;
opacity: 0.7;
margin: 0 10px 5px 0;
}

.zoomeffect img:hover{
-webkit-transform:scale(1.1);
-moz-transform:scale(1.1);
-o-transform:scale(1.1);
opacity: 1;
}

 7. Click on Save the template


How to activate it on images?

Whenever you have uploaded any image in your post editor, simply switch to HTML mode and change the class from what ever it is, to zoomeffect.

Example: Your image class in post editor will be <div class="seperator", now change it to <div class="zoomeffect"

If you are adding it to any other part on your blog, you can use the following code.
 <a class="zoomeffect" href="YOUR-IMAGE-URL/" target="_blank">
<img src="http://YOUR-IMAGE-URL" /></a>

Replace YOUR-IMAGE-URL with the link of the image you want to apply the effect to.
That's all!

How To Add Search Box To Blogger (Header)


How To Add Search Box To Blogger

1. Now go to Blogger Dashboard > Template
2. Download a copy of your template
3. Click on Edit HTML
4. Hit Proceed button
5. Check Expand Widget Templates checkbox
6. Find below code in your template

<div class='descriptionwrapper'>
<p class='description'><span><data:description/></span></p>
Now Add your search box code immediately after these lines.
7. Save the template.That's it :)

How To Create "Scroll to Top" Button To Blogger


How To Create "Scroll to Top" Button To Blogger?

1. Go to Blogger Dashboard > Template
2. Download a copy of your template
3. Click on Edit HTML
4. Hit Proceed button
5. Find below code in your template

]]></b:skin>

6. Now add below CSS code before ]]></b:skin> tag .


/* to top */
#toTop { width:100px;background:#F4FFBF;border:1px solid #ccc;text-align:center;padding:5px;position:fixed;bottom:10px;right:10px;cursor:pointer;color:#666;text-decoration:none; }


7. Now add below code before </body> tag:


<a href="#" id="toTop">^ Scroll to Top</a>
<script src='http://ajax.googleapis.com/ajax/libs/jquery/1.3.2/jquery.min.js' type='text/javascript'></script>
<script type='text/javascript'>
/*-----------------------
* jQuery Plugin: Scroll to Top
* by Craig Wilson, Ph.Creative (http://www.ph-creative.com)
* Bring to you by Zen from http://zenplate.blogspot.com
* Copyright (c) 2009 Ph.Creative Ltd.
* Description: Adds an unobtrusive "Scroll to Top" link to your page with smooth scrolling.
* For usage instructions and version updates to go http://blog.ph-creative.com/post/jquery-plugin-scroll-to-top.aspx
* Do not delete these infomation
* Version: 1.0, 12/03/2009
-----------------------*/

$(function(){$.fn.scrollToTop=function(){$(this).hide().removeAttr("href");if($(window).scrollTop()!="0"){$(this).fadeIn("slow")}var scrollDiv=$(this);$(window).scroll(function(){if($(window).scrollTop()=="0"){$(scrollDiv).fadeOut("slow")}else{$(scrollDiv).fadeIn("slow")}});$(this).click(function(){$("html, body").animate({scrollTop:0},"slow")})}});

$(function() {
$("#toTop").scrollToTop();
});
</script>


 8. Save your template and you are done!

How To Add Popular Post Widget For Blogger


How To Add Popular Post Widget To Blogger

1. Login to your blogger dashboard--> Layout-->'Add A Gadget'
2. Choose Html/Javascript Gadget and paste the following code into the area provided :


<script type="text/javascript">
function pipeCallback(obj) {
document.write('<ol style="text-transform: capitalize;">');
var i;
for (i = 0; i < obj.count ; i++)
{
var href = "'" + obj.value.items[i].link + "'";
var item = "<li>" + "<a href=" + href + ">" + obj.value.items[i].title + "</a> </li>";
document.write(item);
}
document.write('</ol>');
}
</script>
<script src="http://pipes.yahoo.com/pipes/pipe.run?_render=json&_callback=pipeCallback&_id=1a1c6e4e6d4f148e3650fda46910e15f&url=http%3A%2F%2FYOURBLOG.blogspot.com&num=10" type="text/javascript"></script>

Note : Remember to replace YOURBLOG with your blog name.Also you can change 10 to show different number of popular posts.


3. Save HTML/Javascript you are done.